Electromagnetic Drop Link
Shop Now
How It Works
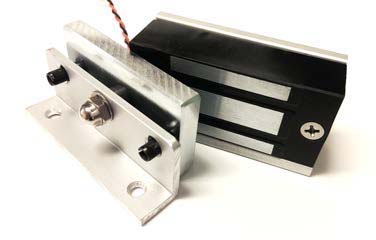
When power is applied to the electromagnetic link, it turns on the unit's built in electromagnet. This electromagnet is attracted to the steel armature plate which is mounted to the Flat-Wall Hook Bar (FWHB) mounting track, holding the FWHB and curtain up to the Data Center Track (DCT). When power to the link is turned off, the electromagnet releases the armature plate, allowing the curtain to fall.
|
Installation
- Drill Holes and install the armature onto the FWHB by doing the following:
a) Find and mark the center of the FWHB length. (typically 8' lengths)
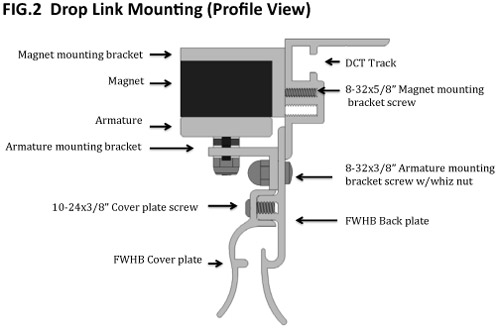
b) With the FWHB cover plate temporarily installed, place the armature mounting bracket centered on the mark and resting on the top edge of the FWHB cover plate and mark holes to be drilld. (see Fig.2)
c) Drill the two holes into the FWHB back plate with a 3/16" drill bit, being careful to drill accurately, so not to cause interference problems with reattaching the FWHB cover plate.
d) Mount the armature with the provided 8-32x3/8" screws and whiz nuts.
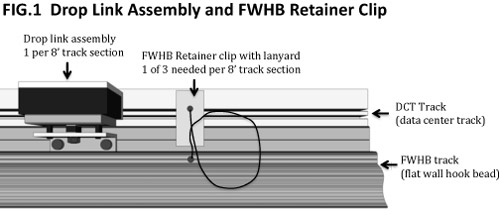
- Mount the electromagnet to the DCT track by doing the following:
a) Locate and mark the center of where the FWHB will land on the DCT length.
b) Remove the electromagnet from its mounting plate, exposing the DCT mounting holes.
c) Install the mounting plate to the upper threaded channel in the DCT with the provided 8-32x5/8" screws in the marked location where the center of the FWHB will land, and then reattach the electromagnet to its plate. (see Fig. 1 and 2)
- Mount the FWHB retainer clips and lanyards by doing the following:
a) Locate and mark 3" in from the ends of where the FWHB will land onto the DCT and also mark 4" to the right of the electromagnet center.
b) Install the retainer clips and lanyards with the provided 8-32x5/8" screws in the 3 marked locations, positioning lanyards in a way that they will not snag when deployed. (see Fig. 1)
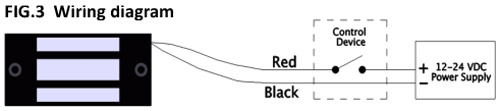
- Connect the electromagnet to the power source to energize so that the installation can be completed by doing the following:
a) Route and connect the power leads to the electromagnet in accordance with all applicable local electrical codes. (see Fig. 3)
b) Energize the electromagnet and lift the FWHB into place slipping the upper flange in behind the retainer clips, the armature plate should contact the electromagnet thus holding the FWHB into place until power is removed.
c) Install the lower half of lanyards onto the nearest FWHB cover plate screw location with the provided 10-24x3/8" screws. (see Fig. 1 and 2)
 Or, contact your local Data Clean account manager for more information.